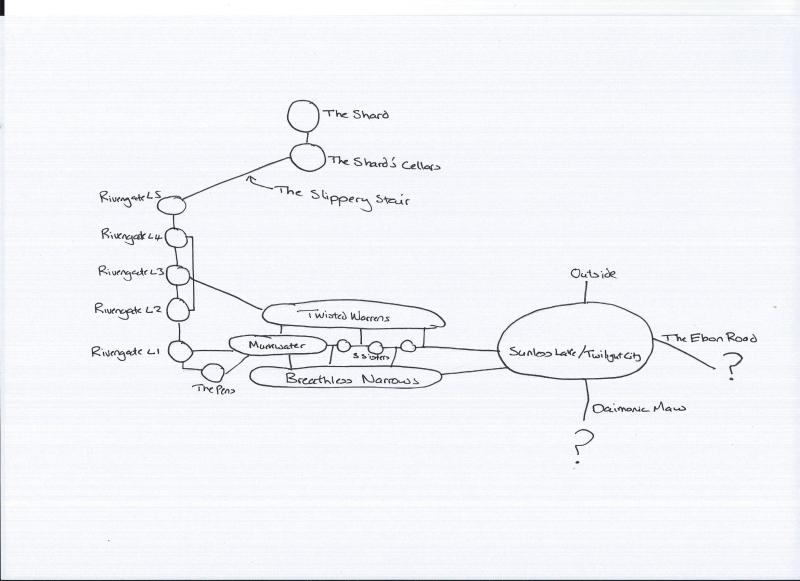
As befits a proper megadungeon, Gloamhold is huge. It has many different levels and sub levels for brave adventurers to explore.
A few weeks ago, I was asked to post a basic map showing how Gloamhold’s various levels connect together. Here is the result:
Remember, when looking at this map that:
- It’s not to scale.
- I’ve only depicted the main levels, sub-levels and connections.
- I’m terrible at mapping.
I found drawing this map tremendously useful. It really helped me visualise the possible flow of any exploration. It shows three main ways into Gloamhold: either through Rivengate, via the Shard and its cellars or through the holes in the cavern roof high above the Twilight City. It also highlighted to me just how much lies between Rivengate and the Sunless Lake. I also like mystery–I’m a fan in not detailing everything from the start–so at this point I’m not yet ready to reveal what lies at the bottom of the Daemonic Maw or at the end of the Ebon Road.
So, what do you think of the map? Are there enough inter-connections? If not, what should I add? For example, the Twisted Warrens could conceivably link to the Sunless Lake; a lost or torturous connection could also exist with the Shard’s cellars and so on. Let me know in the comments below, and help me build a better Gloamhold!


Personally I’m a fan of as much interconnecting as possible, and like the idea of the Twisted Warrens linking to both the cellar of the Shard and the Sunless Lake…
Where there is only one path between two nodes, you might find that the PCs won’t get to explore it. If they don’t find the path, or the path is insurmountably obstructed (even as simple as a locked door and they can’t/won’t kick it down), they won’t be able to see what’s on the other end.
“Multiple paths” can be deceptive. In Steading of the Hill Giant Chief there is a major chokepoint: the map to Glacial Rift of the Frost Giant Jarl and the magic teleporting chain are both in the same treasure room. You nominally have two ways to get there, but they can only be found in the same place. I would count this a single path, even if there are two ways to travel it. Good thing the nobles the PCs work for already know the next step and will send the PCs there (or else… which is something else I don’t much like about it. I digress.)
In this case I see several potential choke points that could bring things to an abrupt halt.
* The Shard to The Shard’s Cellars
* The Shard’s Cellars to the Slippery Stair
* RivengateL5 to RivengateL4
Everything else looks like there are at least two routes to get between them (RivengateL2 to RivengateL1 has a direct link, but also via RivengateL3, Twisted Warrens, Mumwater).
As a general rule, anywhere I want the PCs to be reasonably certain of having a route, I try to provide three. That means there are three opportunities to find the way (conversely, three paths they have to fail to find). Two is a little iffy but still probable. I try to reserve cases of one and only one link to things that are ‘not necessary’, the extras that are rewards to finding them.
To compare, my node-based megadungeon started with eleven nodes, ignoring the ‘outside’ node that was there to provide an anchor for the diagram.
At the start the Wolf Den had only a single link, but the Abandoned Tower and Goblin Den both provided alternate routes to the inside, and all were relatively accessible. And the link between the wolves and the goblins was pretty big and easy to find, mitigating the lack of links a bit.
After that, all of the nodes had at least two links, and many had at least three. The Fungoid Cavern had four! and was something of a travel nexus within the megadungeon.
… bah, forgot to close the href. I meant to only link on “node-based megadungeon started with eleven nodes”.
Looking over the full map, there some single-path links.
* Wolf Den: Leader’s Antechamber -> Leader of the Pack -> Ritual Chamber (which was intended to be a secret, since it points at the Fane of Baalshamoth, located much deeper in the megadungeon)
* Goblin Warren: Chieftain’s Chamber -> Chieftain’s Harem and “Treasure Vault” (such as it was at that point)
* Abandoned Tower: Clockwork Tower Third -> Clockwork Tower Fourth (rickety and dangerous; there is something worth the effort up there if getting there doesn’t kill you)
* Dwarven Safehold: okay, quite a few here, deliberate chokepoints for security reasons. Technically Scout Staging -> (Aboleths) Beachhead isn’t a unique link because there are other ways to get there.
* Fungoid Cavern: Sleeping Forest -> Fresh Water Spring
* Clockwork Hell: Security -> Gearheart. Another deliberate chokepoint.
* Fane of Baalshamoth has four. All are reasonably easy to find if you can get past the well-connected bits “in front of them”, and none are probably critical to exploring the place… but may be worthwhile despite their dangers.
* Shalthazard the Pale also has three, similar in nature (if not detail) to those in the Fane of Baalshamoth.
All in all, on first guess I’d estimate about 15% of all links are single, and all either around the edges to bonus material, or deliberate for security reasons. You have about the same, but a few look like they might be in critical paths.
I like the idea of drawing a basic map beforehand to lay it all out, I’m currently planning a large dwarf-hold dungeon for my forthcoming D&D 5E campaign and this has given me some great ideas 🙂
Excellent. Good luck with the design!